



How to Book a Private Airport Transfer in 5 Steps
Get every booking detail right to avoid pickup problems and ensure smooth private airport transfers.
How to Book a Private Airport Transfer in 5 Steps
Booking a private airport transfer is simple: get your trip details ready, choose the right vehicle, check the rules, enter your details with care, and keep your confirmation for travel day.
If I want to avoid pickup problems, I make sure I have the airport and terminal, full addresses, flight number, passenger count, luggage count, and any child-seat needs before I start. I also check the waiting time and cancellation window before I pay.
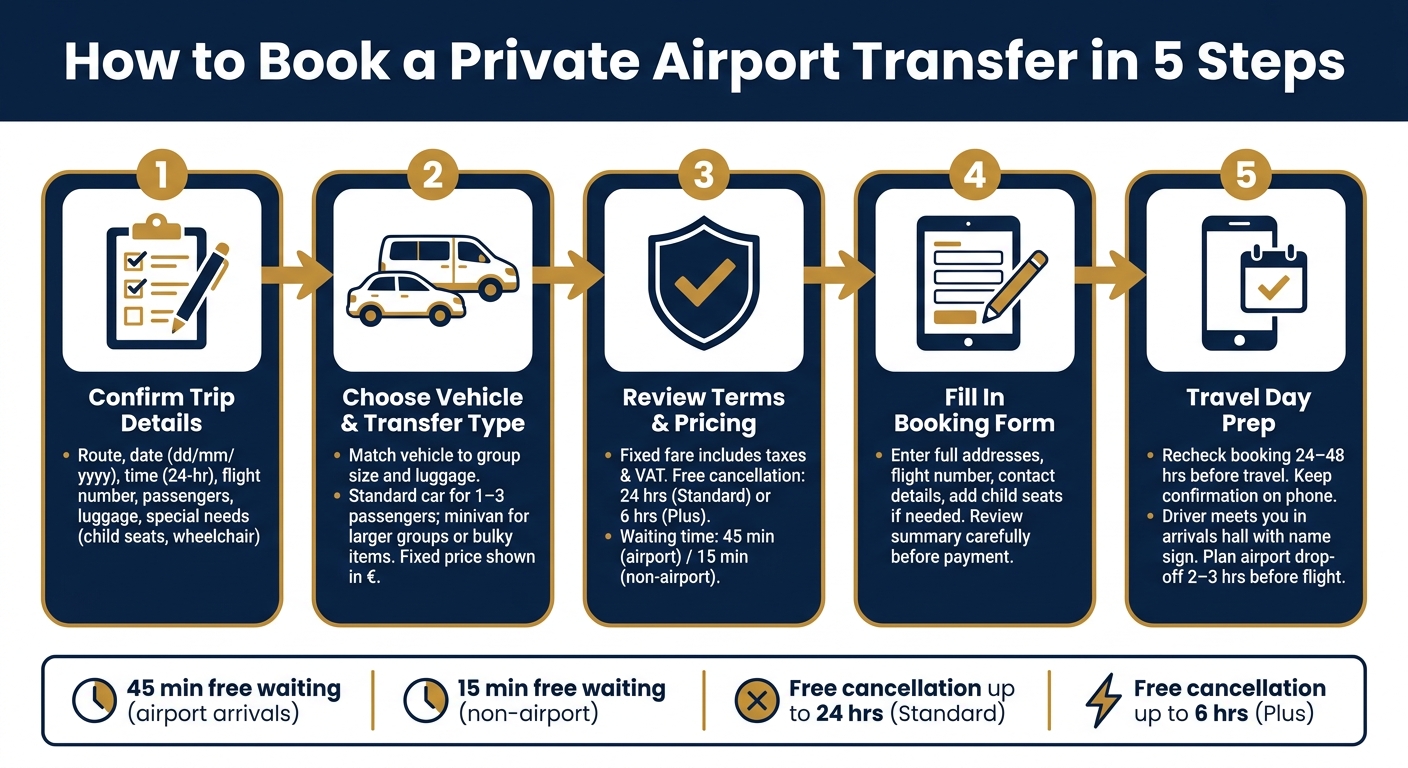
Here’s the full path in one view:
- Step 1: Confirm the route, date, time, flight, passengers, bags, and special requests
- Step 2: Pick the transfer type and a vehicle that fits the group and luggage
- Step 3: Review the fixed fare, what’s included, and the cancellation terms
- Step 4: Fill in the booking form without mistakes and save the confirmation
- Step 5: Recheck the booking 24–48 hours before travel and follow the pickup instructions on the day
A few details matter more than most:
- Airport pickups include 45 minutes of free waiting time
- Non-airport pickups include 15 minutes
- Standard cancellation is free up to 24 hours before pickup
- 7transfers Plus cuts that to 6 hours before pickup
- Airport drop-offs should usually be planned for 2–3 hours before the flight
| Checkpoint | What I review |
|---|---|
| Trip details | Terminal, address, date (dd/mm/yyyy), time (24-hour clock) |
| Group size | Adults, children, babies, and total luggage |
| Vehicle | Space for people, suitcases, pushchairs, or sports gear |
| Booking rules | Waiting time, changes, cancellation, payment |
| Travel day | Confirmation message, mobile access, pickup point |
This guide is a short, practical walk-through of the booking process, with the main steps and the main checks in the right order.
How to Book a Private Airport Transfer in 5 Steps
Step 1: Confirm Your Trip Details and Passenger Needs
Start with the trip details that shape the booking. Get the basics right first, because small gaps here can turn into a messy pickup later.
Gather Route, Date, Time, and Flight Details
For the route, include the full pickup and drop-off addresses, not just the airport name. Add the exact terminal when needed, plus the hotel name or door number for hotel or private addresses. At major Spanish airports such as Madrid (MAD) or Barcelona (BCN), this matters a lot because pickup points can be far apart.
Use the local date in dd/mm/yyyy format, such as 25/09/2026, and the pickup time in the 24-hour clock, such as 14:30. If you're booking an airport arrival, the flight number is a must. It lets the transfer company track your flight in real time if the plane lands early or late.
Count Passengers and Luggage Correctly
Include every traveller in the total: adults, children, and babies. Then count all luggage, including suitcases and carry-on bags. It sounds basic, but this is where many bookings go wrong.
If you're bringing anything bulky, say so from the start. That helps match the vehicle to your group size and the amount of luggage you have.
Note Special Requirements Early
Add any special needs as early as possible so the right vehicle can be assigned. That includes child seats, wheelchair access, and bulky items. For child travel, state the exact seat type needed: baby seat, child seat, or infant seat.
For wheelchair access, confirm whether the wheelchair is folding or motorised, since that changes the space required. It's also smart to mention sports equipment and pushchairs upfront.
| Information | What to Include |
|---|---|
| Flight details | Airline, flight number, arrival/departure terminal |
| Route | Full address, postcode, hotel or building name |
| Schedule | Date (dd/mm/yyyy), pickup time (24-hour format) |
| Passengers | Number of adults, children, and babies |
| Luggage | Number of suitcases and carry-on bags |
| Special requirements | Child/baby seats, wheelchairs, sports equipment |
With these details ready, you can move on to choosing the right vehicle and transfer type.
Step 2: Choose the Route, Vehicle, and Transfer Type
With your trip details ready, it’s time to choose the transfer type, vehicle, and any extras that fit your journey.
Pick the Transfer Type That Matches Your Trip
7transfers covers airport arrivals, airport departures, return transfers, and routes with an extra stop. For arrivals, the driver meets you in the terminal with a name sign and includes up to 45 minutes of free waiting. For departures, pickup from your address includes 15 minutes. If you need both parts of the journey, choose the return transfer option. If your route includes one planned stop, select the extra-stop option.
Match the Vehicle to Your Group and Luggage
Choose your vehicle based on passenger count and luggage space. A standard car is a good fit for 1–3 passengers with standard luggage. A minivan or larger vehicle makes more sense for bigger groups or bulky items like pushchairs, sports equipment, or extra-large suitcases.
If you’re not sure which size to book, go one category up. It’s a simple way to avoid awkward space problems at pickup.
Check the Fixed Price Before Moving On
Once you choose the route, vehicle category, and any extras, 7transfers shows a fixed, all-inclusive price in euros (€), including taxes and VAT, with no hidden fees. The quote is based on the route, distance, and vehicle type, so the amount is set in advance.
Before you move on, check the final total and make sure the vehicle and extras match your booking.
Next, review what the fare includes and the booking rules before you pay.
Step 3: Review Service Features, Pricing, and Booking Conditions
Confirm What Is Included in the Transfer
Once you’ve picked your route and vehicle, take a minute to check what’s covered in the fare and what happens if your plans shift.
With 7transfers, the fixed price includes professional licensed drivers, insured vehicles with flight tracking, and a meet-and-greet service in the arrivals hall with a name sign. For airport pickups, you get 45 minutes of free waiting time from landing. For non-airport pickups, it’s 15 minutes.
That matters more than it may seem. A fixed fare is one thing, but knowing your driver will track your flight and wait if you’re a bit delayed makes the whole trip feel much less stressful.
Check Support, Confirmation, and Payment Details
After you complete the booking, you’ll get instant confirmation by email, SMS, or WhatsApp, plus trip updates before pickup.
If anything comes up before or during your trip, 24/7 customer support is available by phone, email, WhatsApp, and online chat.
Payment is made securely at checkout. The fare shown at checkout is the fixed price, and it includes taxes, VAT, and fees.
Read the Cancellation and Change Rules
Before you lock things in, check the cancellation and change terms.
Standard bookings come with free cancellation up to 24 hours before pickup. 7transfers Plus cuts that window to 6 hours before pickup and also adds 3-hour flight-delay protection.
Here’s the quick comparison:
| Feature | Standard Booking | 7transfers Plus |
|---|---|---|
| Free cancellation | Up to 24 hours before pickup | Up to 6 hours before pickup |
| Changes to the booking | Standard terms apply | Free up to 6 hours before pickup |
| Airport waiting time | 45 minutes included | 45 minutes included |
One more detail: bank and processor fees are non-refundable, and the 7transfers Plus fee is also non-refundable.
With that clear, you’re ready to move to the booking form and enter your details carefully.
sbb-itb-ff87004
Step 4: Fill In the Booking Form and Avoid Common Mistakes
Enter Trip, Contact, and Passenger Details Carefully
Small mistakes in the form can lead to pickup issues. So take your time here. Using the details from Step 1, fill in each field with care before you pay.
Enter the pickup and drop-off details exactly as they appear in the address and flight info. Include the full address, plus any apartment, floor, or building number. Add the flight number too, so the driver can track delays or early arrivals.
For contact details, use a mobile number that can receive WhatsApp messages or SMS, along with a valid email address. Then check the vehicle one more time to make sure it still fits your group and your bags.
Add Extras and Review the Reservation
If you need a child seat or baby seat, add it at this stage. It won't be included by default.
Before moving to payment, read the booking summary from top to bottom. Pay close attention to:
- Pickup date and local time, especially for overnight flights
- Full destination address, including apartment or floor details
- Passenger and luggage count compared with the vehicle selected
If everything matches your trip, you’re ready to pay.
Pay and Save the Confirmation
Pay using the secure checkout, then save the booking reference and confirmation. You should get it by email, SMS, or WhatsApp. Keep that message handy for travel day.
You’ll use the confirmation details to get ready for pickup on the day of travel.
Step 5: Get Ready for Travel and Use Your Booking on the Day
Review the Booking 24–48 Hours Before Travel
Once the booking is done, give it one last check 24–48 hours before you travel. It’s a simple step, but it can save you a headache later. Keep the confirmation on your phone so it’s easy to pull up when you need it.
| Detail to Check | Recommended Action |
|---|---|
| Pickup time | Verify it against your latest flight itinerary |
| Terminal or address | Confirm the specific terminal number or hotel entrance |
| Passenger count | Make sure the vehicle still fits everyone |
| Luggage | Check that the number of bags still matches the vehicle's capacity |
| Contact info | Make sure the mobile number provided is reachable while you travel |
It also helps to make sure you’ll have roaming or local mobile data during the trip, so you can receive live updates.
How Airport Pickup and Drop-Off Work
On the day of travel, use the booking details you saved to find your driver without any fuss.
If you’re arriving, first go through passport control, collect your bags, and then head to the arrivals hall. Your driver will meet you there with a name sign and take you to the vehicle. The driver also tracks your flight, so if it lands early or late, the pickup adjusts to match. Your booking includes 45 minutes of waiting time from landing.
If you’re heading to the airport, plan to arrive 2–3 hours before your flight.
Conclusion: The Five-Step Booking Path at a Glance
The whole process comes down to five clear actions: gather the right trip details, pick the vehicle that fits, check the terms, fill in the booking form, and travel with your confirmation ready. When you get the small details right at the start, the rest of the trip tends to go much more smoothly.
FAQs
What if my flight is delayed?
No need to stress. We track your flight in real time, so if the schedule changes, we’ll see it.
Depending on your booking, flight delay protection covers up to 3 hours at no extra cost. You also get a complimentary airport waiting period, so your driver will still be there when you land. If you need a hand, customer support is available 24/7.
How do I know what vehicle size to book?
Choose a vehicle that fits both your number of passengers and your luggage needs. You’re responsible for entering the correct passenger total, so the vehicle arrives with the right setup.
As a general guide, sedans usually take 1 to 4 passengers, while MPVs, vans, and minibuses are better for groups of 5 to more than 24. Include both checked luggage and hand luggage so everyone - and everything - fits comfortably.
Can I change my booking after paying?
Yes - you can change your booking after payment, but extra charges may apply.
If you booked 7Transfers Plus, changes to your date, time, or flight number are free up to 6 hours before pickup, subject to vehicle availability.
If not, the standard modification policy applies. Check your booking confirmation or contact support at booking@7transfers.com.